Target
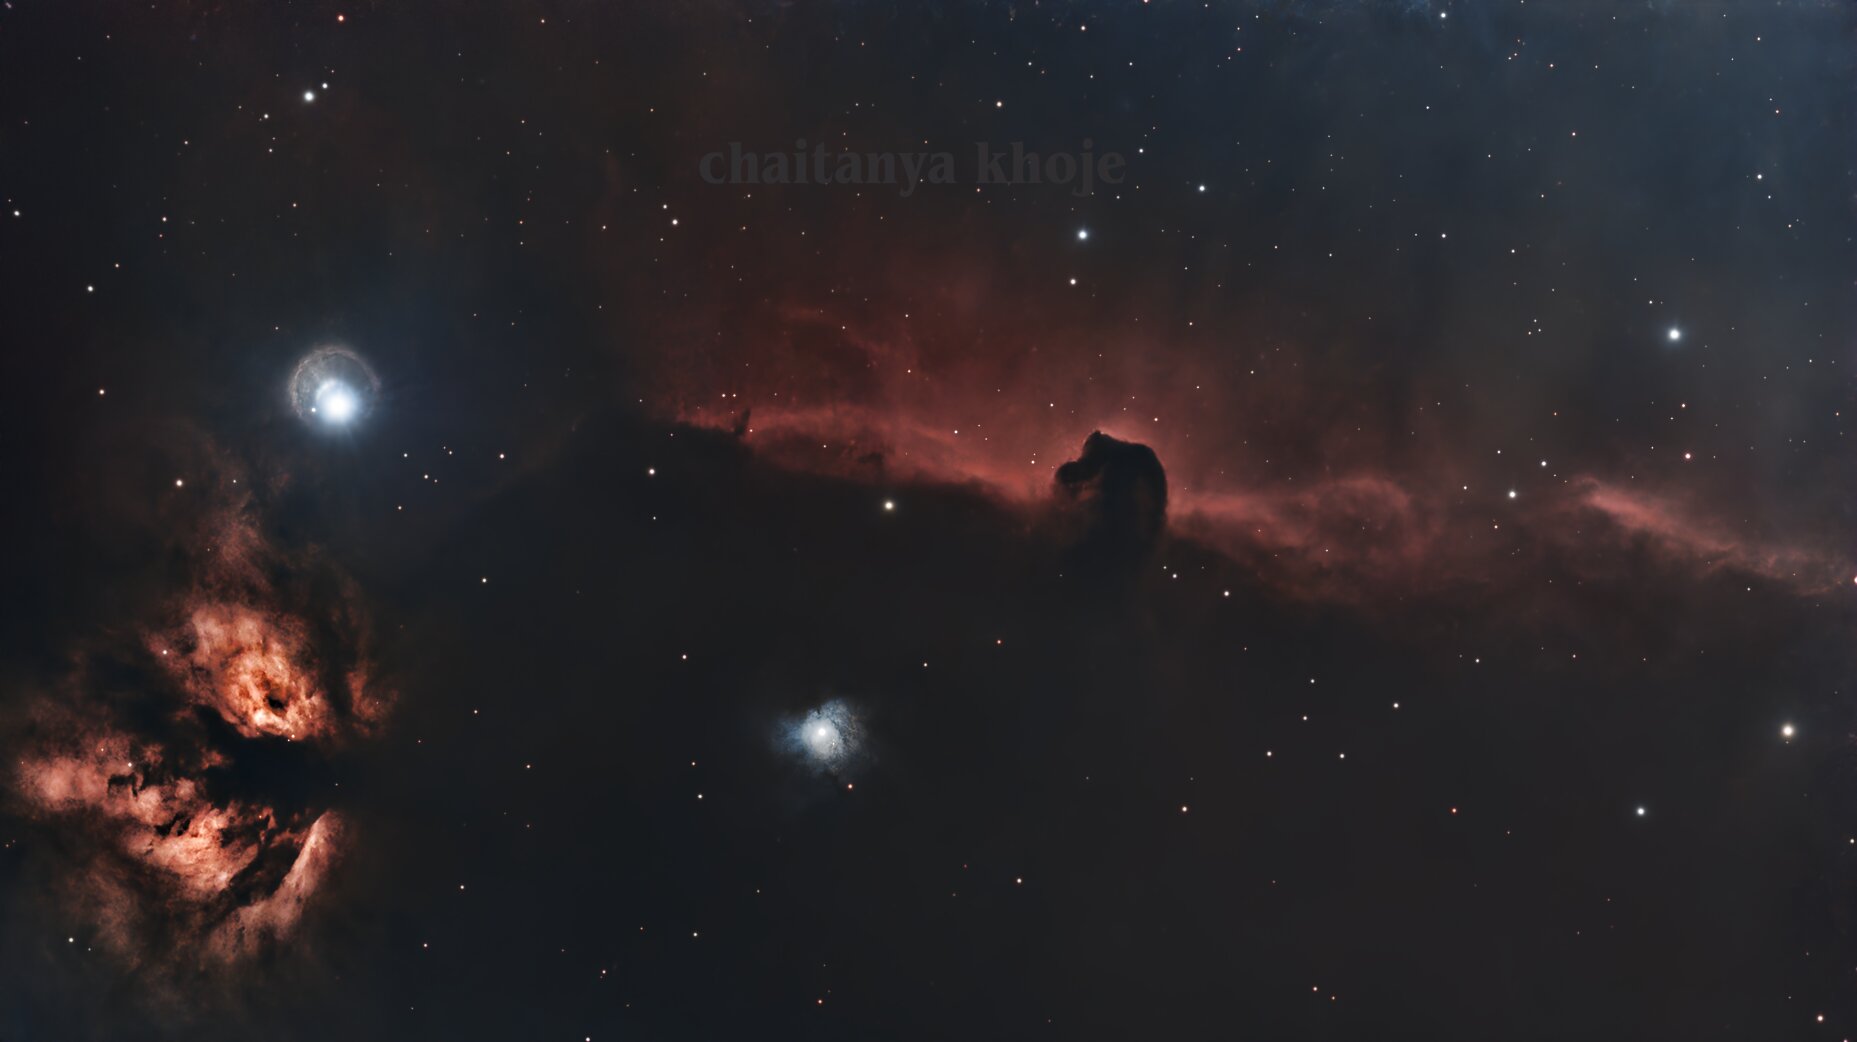
The Horsehead Nebula (Barnard 33) is a dark absorption nebula silhouetted against IC 434, the faint hydrogen emission sheet south of Alnitak in Orion’s Belt. The nearby Flame Nebula (NGC 2024) adds bright structure and a difficult glare source from Alnitak.
This workflow is written as a PixInsight recipe: which process to open, what to set, what to inspect, and what output to carry forward. It does not depend on screenshots of the PixInsight dialogs.
Acquisition
The Seestar S50 ran across two nights in EQ mode, tracking the field with electronic field de-rotation. Ten-second subs kept Alnitak under control while accumulating enough signal to pull IC 434 and the Horsehead silhouette out of a Bortle 8 sky.
| Parameter | Value |
|---|---|
| Dates | Jan 30–31, 2026 |
| Total frames | 1146 × 10 s |
| Filter | Built-in LP |
| Sensor | 1080×1920 px · Bayer CFA |
| Mode | CFA / OSC |
| Calibration frames | None |
No darks, flats, or bias frames were used. WBPP handled the light frames directly, so the later normalization and background extraction steps matter more than they would in a fully calibrated dataset.
Workflow Overview
| Stage | Process / module | Purpose | Output |
|---|---|---|---|
| Preprocessing | WeightedBatchPreprocessing | Load, measure, register, normalize, and integrate the OSC lights | Linear RGB master |
| Frame conversion | Debayer | Convert CFA frames to RGB | Debayered registered frames |
| Frame matching | Local Normalization | Match sky background across two nights | Normalized frames for stacking |
| Integration | ImageIntegration / DrizzleIntegration | Reject bad pixels and combine the accepted frames | Final linear master |
| Crop/orientation | FastRotation / DynamicCrop | Correct orientation and remove edge artifacts | Clean linear working frame |
| Gradient removal | DynamicBackgroundExtraction | Remove light pollution and field gradients | Linear gradient-corrected image |
| Linear correction | BlurXTerminator, NoiseXTerminator, SCNR | Correct star profiles, reduce noise, neutralize green cast | Cleaner linear image |
| Starless workflow | StarXTerminator | Separate stars from nebula before stretching | Starless image plus star layer |
| Stretch | PixelMath, Statistical Stretch | Set a robust blackpoint and stretch midtones | Nonlinear image |
| Local contrast | LocalHistogramEqualization, HDRMultiscaleTransform | Bring out nebula structure and control Alnitak | Finished nonlinear image |
Part 1: WBPP Preprocessing Recipe
PixInsight’s process interfaces are parameter-driven. The useful mental model is not “follow the log”; it is “configure the process, apply it, inspect the output, then carry that output into the next process.”
1. Load the Lights in WeightedBatchPreprocessing
Use: Script > Batch Processing > WeightedBatchPreprocessing
Set:
- Add all 1146 Seestar light frames as one light group.
- Confirm the image size is
1080x1920, binning is1, exposure is10.00 s, and the data is CFA/OSC. - Do not attach calibration masters for this run.
Inspect:
- WBPP should show all 1146 light frames active.
- The group should be treated as CFA data before debayering.
- If WBPP splits the frames into unexpected groups, check the filter, exposure, and metadata fields before continuing.
Output: A configured WBPP run ready to debayer, measure, register, normalize, and integrate the lights.
2. Debayer the CFA Frames
Use: WBPP’s debayer step, using PixInsight’s Debayer process internally.
Set:
- Bayer pattern:
Auto - Debayer method:
VNG
Inspect:
- All 1146 frames should convert from CFA to RGB.
- If the preview has incorrect color, the auto-detected Bayer pattern is the first thing to question.
Output: RGB light frames ready for measurement and registration.
3. Measure and Weight the Frames
Use: WBPP frame measurement and weighting.
Set:
- Let WBPP measure FWHM, eccentricity, and SNR.
- Keep SNR-weighted integration enabled.
Inspect:
- Look for obvious outliers: high eccentricity, unusually poor FWHM, or low SNR.
- Do not reject frames just because they are below average; weighting lets weak frames contribute less.
Output: A scored frame set that WBPP can use for reference selection and integration weights.
4. Register the Frames
Use: WBPP registration, using PixInsight’s StarAlignment process internally.
Set:
- Let WBPP choose the reference frame automatically.
- The selected reference for this run was
Light_IC 434_10.0s_LP_20260131-192733_d.xisf.
Inspect:
- Registration accepted 1138 of 1146 frames.
- The 8 failures were only 0.70% of the dataset, which is low enough to continue.
- If failures cluster in time, inspect those subs for clouds, field jumps, or tracking glitches.
Output: 1138 registered RGB frames.
5. Apply Local Normalization
Use: WBPP local normalization, using PixInsight’s LocalNormalization process internally.
Set:
scale: 270
rejection: enabled
highClippingLevel: 0.85
referenceRejectionThreshold: 3.00
Inspect:
- This step is important because the dataset spans two nights and has no flats.
- Check that the background correction does not flatten real IC 434 nebulosity.
- Alnitak creates a strong local illumination gradient, so local normalization should improve frame-to-frame consistency before stacking.
Output: Registered frames with more consistent background illumination.
6. Integrate the Stack
Use: WBPP integration, using PixInsight’s ImageIntegration and DrizzleIntegration processes.
Set:
- Rejection method:
Linear Fit Clipping - Normalization: local rejection normalization
- Combination: SNR-weighted average
- Keep the drizzle-integrated master if WBPP produces both standard and drizzle outputs.
Inspect:
- The accepted integration should represent 1138 frames, or roughly 3h 10m of exposure.
- Check the rejection maps for strong residual trails, hot pixels, or edge artifacts.
- Compare the standard and drizzle masters before choosing the working master.
Output: Final linear RGB master for manual processing.
Part 2: Linear Processing Recipe
Work on the linear master before stretching. Linear corrections are usually cleaner because the noise and gradients have not been amplified yet.
1. Correct Orientation and Crop Edges
Use: FastRotation, ChannelCombination if needed, then DynamicCrop.
Set:
- Rotate to the preferred composition after WBPP output.
- Crop away the registration and rotation edges.
- Keep the Horsehead, Flame, and Alnitak halo inside the frame.
Inspect:
- Do not crop so tightly that the Flame or Alnitak’s halo feels clipped.
- Check all corners for black wedges or stacking artifacts.
Output: Clean linear RGB frame with usable edges.
2. Remove Gradients with DynamicBackgroundExtraction
Use: Process > BackgroundModelization > DynamicBackgroundExtraction
Set:
- Place samples manually in true background regions.
- Avoid the Horsehead, IC 434 emission, the Flame, and Alnitak’s halo.
- Use a modest polynomial correction; this run used a second-order model.
Inspect:
- The background should become more even without erasing the red IC 434 sheet.
- If the nebula loses contrast, remove or move samples that landed on faint emission.
- If Alnitak’s side of the frame over-corrects, reduce sample pressure near the halo.
Output: Linear image with the light pollution gradient reduced.
3. Correct Blur Before Sharpening
Use: RC-Astro BlurXTerminator
Set:
- First pass: correction only.
- Second pass: full correction with moderate sharpening.
- This run used automatic nonstellar PSF estimation and a balanced star/nonstellar sharpening around
0.50.
Inspect:
- Stars should become tighter without hard rings.
- The Horsehead edge should gain definition without looking cut out.
- If small stars become crunchy, reduce star sharpening before touching the nebula settings.
Output: Linear image with corrected star profiles and cleaner structure.
4. Reduce Linear Noise
Use: RC-Astro NoiseXTerminator
Set:
denoise: 0.90
denoise_color: 0.90
detail: 0.15
iterations: 2
color_separation: enabled
Inspect:
- The background should smooth out, but the Horsehead edge should remain intact.
- If the nebula starts looking plastic, lower denoise or raise detail preservation.
Output: Linear image with lower background and chroma noise.
5. Separate Stars Before Stretching
Use: RC-Astro StarXTerminator
Set:
- Enable star output so the star layer is saved separately.
- Apply to the linear image after blur and noise correction.
Inspect:
- The starless image should retain the nebula without large star holes.
- The star layer should preserve Alnitak and the smaller field stars for later recombination.
Output: A starless nebula image and a separate star layer.
6. Neutralize Green Cast
Use: Process > NoiseReduction > SCNR
Set:
colorToRemove: Green
amount: 1.00
protectionMethod: Average Neutral
preserveLightness: enabled
Inspect:
- The background should lose the OSC green cast.
- Red Ha emission should not shift toward magenta.
Output: Linear starless image with cleaner color balance.
Part 3: Stretch and Nonlinear Processing Recipe
After stretch, the image is easier to judge visually, but noise and halos are also easier to exaggerate. Make smaller adjustments and inspect often.
1. Set a Robust Blackpoint with PixelMath
Use: Process > PixelMath > PixelMath
Set:
Use the luminance-weighted median and MAD pattern from this run:
cr=0.2126; cg=0.7152; cb=0.0722;
Med = cr*med($T[0]) + cg*med($T[1]) + cb*med($T[2]);
Sig = 1.4826*(cr*MAD($T[0]) + cg*MAD($T[1]) + cb*MAD($T[2]));
BPraw = Med - 5*Sig;
BP = iif(BPraw < MinC, MinC, BPraw);
Rescaled = ($T - BP) / (1 - BP);
Inspect:
- The background should be controlled but not clipped.
- The faint IC 434 emission covers a large part of the field, so avoid forcing the whole background to black.
Output: Linear image with a statistically controlled blackpoint.
2. Stretch the Starless Image
Use: statisticalstretch.js
Set:
targetMedian: 0.27
curvesBoost: 0.37
linkedStretch: enabled
blackpointSigma: 3
numIterations: 1
Inspect:
- IC 434 should lift out of the background without washing out.
- Linked stretch should preserve the red-dominant color balance.
- If the background becomes too bright, reduce the target median before adding more contrast.
Output: Nonlinear starless image.
3. Clean Up Stretch-Amplified Noise
Use: RC-Astro NoiseXTerminator
Set:
- Start from the same conservative detail-preserving settings used in the linear pass.
- Apply less aggressively if the stretched image already looks smooth.
Inspect:
- Look at the faint red emission around the Horsehead, not just the dark sky.
- Avoid wiping out soft Ha texture.
Output: Nonlinear starless image with controlled shadow noise.
4. Work the Red Channel if Needed
Use: ChannelExtraction, then CurvesTransformation
Set:
- Extract RGB channels.
- Use the red channel as the main reference for Ha contrast.
- Apply small curve adjustments rather than a single large move.
Inspect:
- The Horsehead silhouette should separate more clearly from IC 434.
- The Flame should not become oversaturated or disconnected from the surrounding field.
Output: Color-balanced nonlinear image with stronger Ha contrast.
5. Add Local Contrast
Use: Process > IntensityTransformations > LocalHistogramEqualization
Set:
radius: 124
slopeLimit: 2.0
amount: 0.630
histogramBins: 8-bit
circularKernel: enabled
Inspect:
- The Horsehead edge and Flame structure should gain local definition.
- Watch for halos around Alnitak and bright stars.
- If flat background areas become noisy, reduce amount before changing radius.
Output: Nonlinear image with stronger mid-scale nebula contrast.
6. Compress Bright Structure
Use: Process > MultiscaleProcessing > HDRMultiscaleTransform
Set:
numberOfLayers: 5
invertedIterations: enabled
scalingFunction: B3 Spline (5)
largeScaleDeringing: 0.250
toIntensity: enabled
Inspect:
- Alnitak’s halo should feel less dominant.
- The Flame should keep internal structure without looking flattened.
- HDRMT cannot recover saturated detail; it only compresses the surrounding bright structure.
Output: Nonlinear image with better highlight control.
7. Finish with Curves and Star Recombination
Use: CurvesTransformation, then recombine with the saved star layer.
Set:
- Use small S-curve moves for contrast.
- Use saturation carefully on the red channel.
- Add stars back after the nebula stretch is stable.
Inspect:
- Alnitak should not dominate the histogram again after recombination.
- Small stars should look present but not sharpened beyond the nebula.
- The Horsehead silhouette should remain dark without clipping into a featureless black patch.
Output: Final RGB image.
What To Watch For
- DBE samples on nebulosity: IC 434 is broad and faint. Bad samples can subtract the target itself.
- Alnitak biasing the stretch: separating stars before stretch keeps the nebula from being held down by the bright star.
- Over-denoising: NoiseXTerminator can make faint Ha texture look synthetic if the denoise amount is too high for the stretched image.
- Local contrast halos: LHE and HDRMT both help the Flame and Horsehead, but both can create halos near bright stars.
- False black background: this field is not empty sky. A very dark background usually means faint emission has been clipped.
Results Summary
| Stage | Input | Output |
|---|---|---|
| Debayering | 1146 CFA frames | 1146 RGB frames |
| Registration | 1146 attempted | 1138 accepted, 8 rejected |
| Stack integration | 1138 x 10 s | ~3h 10m |
| Post-processing | Linear RGB master | Finished RGB image |
Yield: 99.3%. The key choices were local normalization for the two-night, no-flat dataset; DBE for the urban gradient; star separation before stretching; and controlled local contrast to keep the Horsehead and Flame structured without letting Alnitak take over the frame.